Kimchi Cauliflower Ricotta Loaded Toast

At Acid League, we pride ourselves on our love of adventure and experimentation. We’re known to tinker with ingredients, mix flavors that “shouldn’t” be combined, and randomly happen upon creations that we later realize we can’t live without.
It's in this spirit that most of these recipes were concocted—guided by imagination over exact measurement. Our goal is to inspire home cooks to do the same, and we hope readers use these recipes as a starting point instead of a precise rulebook to be followed.
Have fun and enjoy culinarily outside the lines!
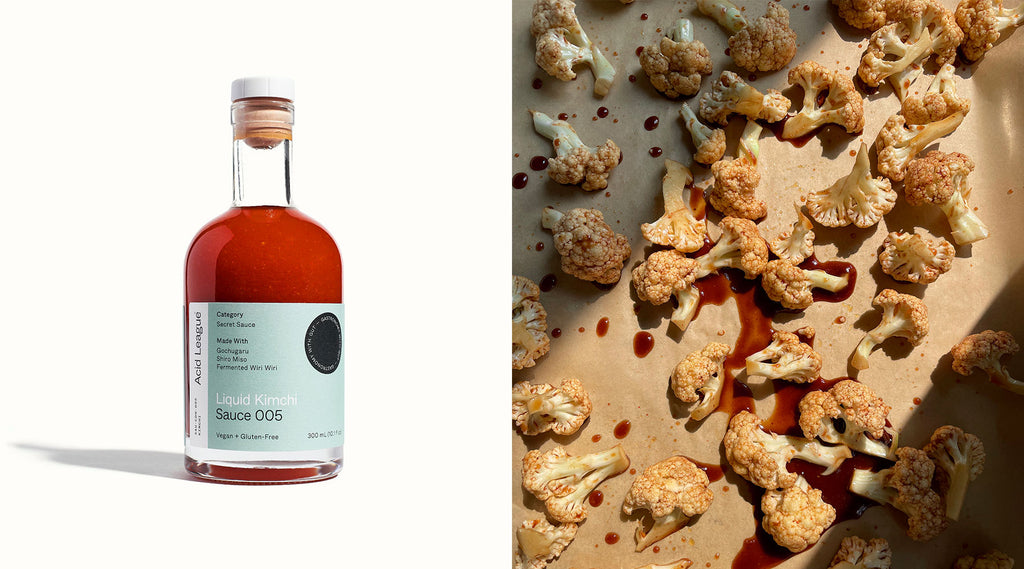
Using Liquid Kimchi.
When it comes to preparing food in these warm summer months, I find myself gravitating towards low effort, high impact, snacky meals. I realize that seems contradictory when I’m suggesting that you also make fresh ricotta, but hear me out. It’s the perfect foundational component to a loaded toast, and can handle a wide range of toppings, so once you make a batch, you’ll have lunch for the next few days. Plus, it’s the perfect thing to make with your TV on in the background if you’re bored one afternoon. Since you’re waiting around, you might as well roast some cauliflower. Well, now it’s 6pm and you realize you’re hungry, so you throw it all on a few slices of sourdough, and you have a meal!
Listen, I won’t be offended if you have a nonna that makes fresh ricotta all the time and you want to completely disregard this recipe, because you can get the good stuff straight from the source. That said, if you decide that you want to make it yourself one day, keep reading for a step-by-step guide on how to make your own foolproof batch of delightfully creamy ricotta.
x Loritta Lin, Innovation Manager at Acid League
Kimchi Cauliflower Ricotta Loaded Toast
INGREDIENTS
|
1/2 head |
Cauliflower |
|
2 spoonfuls |
Ricotta |
| 1 tsp | Fermented bean curd, smushed (can substitute with miso or doenjang) |
| 2 tbsp | Raw sugar |
| 1 1/2 tsp | Soy sauce |
| 1 1/2 tbsp | Liquid Kimchi |
| 2 tbsp | EVOO |
| 1/2 tsp | Sesame oil |
| 1/4 tsp | Dijon mustard |
| small pinch | Salt and white paper, to taste (quite salty from other ingredients already, so really just a small pinch!) |
METHOD
- Preheat oven to 425ºF. Line baking sheet with parchment paper.
- Cut cauliflower into bite-sized florets.
- Mix all marinade ingredients together in a large bowl. Add cauliflower and toss thoroughly.
- Spread cauliflower pieces out on parchment paper, leaving enough space between pieces to prevent steaming.
- Roast for 20-30 minutes, or until tender and nicely browned, stirring/flipping halfway through.
- To assemble, toast sliced sourdough (I prefer to do this in a fry pan with oil and salt/pepper, but it can be toasted or baked as well). Then spread desired amount of ricotta, top with roasted cauliflower, and sprinkle fried shallots on top. Enjoy!
Homemade Ricotta
INGREDIENTS
| 1/2 gallon | Whole milk |
| 2 cups | Buttermilk |
METHOD
Note: The milk to buttermilk ratio is 1:4, so you can easily change the quantities to make more or less cheese.
Yield: approximately 2 cups.
- Combine whole milk with buttermilk in a non-reactive, heavy-bottomed pot.
- Heat slowly and uncovered over medium-low/medium heat, until temperature reaches 180ºF. Gently stir occasionally throughout the heating process to prevent scorching. Once the temperature reaches around 150ºF, curds will start to form. Try to avoid stirring too much at this point. You can continue to gently scrape the bottom of the pot from below to prevent scorching.
- Once the milk reaches 180ºF, remove pot from heat and let sit uncovered/undisturbed for 30 minutes. This will allow the curds to fully form. At this point, the whey should no longer look like milk and should be somewhat translucent. It may also have a slightly green/yellow tint, which is due to the high riboflavin (vitamin B2) content - this is normal. While it sits, prepare a colander or sieve lined with at least 2 layers of cheesecloth.
- Using a slotted spoon, carefully scoop large chunks of the curds into the lined colander/sieve to drain, trying not to break up the curds too much.
- Carefully gather the cheesecloth and wrap the curds to create a small parcel within the colander/sieve. Place a small plate on top to provide equally distributed pressure. Put a heavy, unbreakable object on top to press (eg. cans of beans or tomato sauce). Allow to drain for 1-2 hours.
- Unwrap the cheese and place into a container. Refrigerate or eat right away!
TIPS
- Patience and temperature control is key!
- Do not allow the milk to boil or heat too quickly. If it heats too quickly, the water will escape the curds too quickly, resulting in a tougher/grittier texture. Adjust heat as needed.
- Stirring too much will disturb and break up the curds, which will cause more moisture to escape, creating a less creamy texture.
- Rinse cheesecloth to remove any dust or little cloth bits left behind. This also helps cheesecloth stay in place a little bit better.
- My preference is to press for only 1 hour to maintain the maximum level of moisture and yield for optimal creaminess. If you prefer a crumbly texture, then press for longer.
Good luck and have fun!!